

So, you’re new around the web hosting block and you’re looking to familiarise yourself with the area. First you’ll want to focus on your control panel – cPanel. We’ll walk you through the ins and outs so you’re coming and going with ease.
cPanel can be pretty confusing if you’ve never worked with a web-based control panel before. Most guides are written for those with a web hosting background by tech gurus with little concern for the uninitiated. If, like many, you’re part of the latter, this guide is for you.
What is cPanel?
cPanel is a web-based control panel where you can manage everything you need to host a website. This includes convenient extras like email, FTP (File Transfer Protocol) accounts, and DNS (Domain Name Systems), and a pleasant graphical user interface to wrap it all up. It’s easy to keep up to date as long as you don’t try to modify the way it works or overload it with non-standard plugins.
This lucky packet of a control panel is the most straight-forward management system you’ll find. Its user-friendly interface makes it a breeze to operate, whether your OS is Windows-based or Linux-based.
With cPanel you can:
- Link domain names to your site
- Set up emails for your site
- Install content management systems (CMS) like WordPress or Joomla
- Back-up your website
- Upload or Download files or images
- Check your bandwidth usage
and a lot more advanced bells and whistles, plus some nifty security gadgets.
How to log in to cPanel?
Once you’ve bought your cPanel hosting package from us, you’ll receive an email with login details for your cPanel site. This can be an IP address (e.g., 123.234.123.234:2083) or a domain name (i.e., https://yourdomain.ng:2083).
After you navigate to this address with your browser, you’ll get the cPanel login page. Enter your username and password and your cPanel will pop right up. We’ve whipped out the magnifying glass for an even closer look, depending on whichever you prefer.
Directly via browser
If you’re counting the valuable seconds spent on logging in, this is the method that’ll suit you best.
Log into cPanel directly via your URL (via browser).
- Use the cpanel sub-domain prepended to your domain. i.e.,
cpanel.yourwebsite.com
- Use cPanel’s port (:)
2083appended to your domain or IP address. i.e.,yourwebsite.com:2083or123.234.123.234:2083
Note: you might see the URL change. This is simply the name of the web server hosting your account. It’ll still take you to your own cPanel, so don’t be alarmed if you spot it.

Enter your login credentials you got in the welcome email after you made your payment.
Note: If the CNAME Records (DNS Records) for your website doesn’t exist yet, you’ll have to use this port method to login.
Should you get the error: “Bad credentials”, please open a support ticket from your Client Area or send an email to support@hostafrica.com requesting the login details.
Should you get the error: “Bad credentials”, please open a support ticket from your Client Area or send an email to support@hostafrica.com requesting the login details.
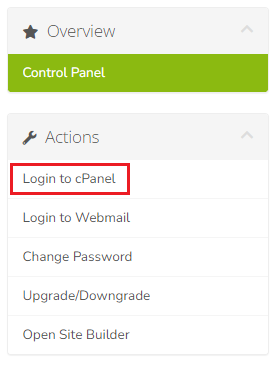
Via WHMCS Client Area
If you prefer the scenic route of your Client Area, this one’s for you. The secret: It’s practically just as quick as the browser login.
Note: If your domain is using external nameservers you won’t be able to access cPanel via our Client Area.
Log in to your Client Area and select the relevant Product/Service.

Under the Actions panel on the left-hand side, click Login to cPanel.

How to access cPanel Webmail
Logging into your cPanel email account is the equivalent of your friend copying your homework after you asked them to make it look different. A few small changes here and there, but the major difference is essentially just the names.
Directly via browser
Once more, the quickest method would be via your browser.
- Use the webmail sub-domain prepended to your domain i.e.,
webmail.yourwebsite.com
Use cPanel’s port (:) 2096. i.e., yourwebsite.com:2096
Both methods should take you to this page:


